American ExpressAmerican ExpressAmerican ExpressAmerican ExpressAmerican Express
Contact UsLogin
AustraliaChange Country

Making FX International Payments

Effective 5 May 2023, only the American Express AccessLine service for payments to Australian domestic suppliers will be available to new customers of American Express Foreign Exchange International Payments (FXIP). AccessLine Terms and Conditions will apply to new customers that open an AccessLine account on and from 5 May 2023.

What you’ll need to get started:


  • 1The link to FX International Payments.

  • 2Your login details. If you haven’t logged in before, go to the Logging In tutorial.

  • 3Payment details, including the currency and amount you’d like to send.

  • 4Payee information, including their name, address and bank information.

TIP : Outgoing Telegraphic Transfers deposit funds directly into your beneficiary’s account. Outgoing Drafts are paper cheques that can be delivered to you overnight and then sent to your beneficiary by post.

Useful Terms


Visit our Glossary to familiarize yourself with terms and processes referred to throughout this site and the FX International Payments online platform.

Creating a Payment with AccessLine


For a detailed guide on how to Create a Payment with AccessLine, please click here

Creating a Payment


Go to Create & Manage Payments > Create a Spot Payment, then:


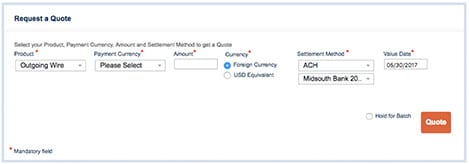
  • 1Choose Telegraphic Transfers or Outgoing Draft from the Product drop-down menu.

  • 2Select the currency you want to send from the Payment Currency drop-down menu, then enter the Amount you want to send.

  • 3Select whether the Amount is in Foreign Currency or Local Equivalent. For example, if you would like to send 1,000 EURO, select Foreign Currency. If you would like to send $1,000 worth of EURO, select USD Equivalent.

  • 4You can now choose how you want to pay for the transaction from the Settlement Method drop-down menu. If you select Telegraphic Transfer, you’ll need to click the Pay to American Express info button to view receiving bank information. If you select ACH (Automated Clearing House) transfer as the Settlement Method, the debit will normally be sent to your checking account two business days before the selected Value Date.

TIP : The Value Date is the estimated date that the funds will be released to the beneficiary bank. Please note that if additional information is required, the value date may change.


  • 5To batch same-currency wires, check the Hold for Batch box. Once batched payments are created, they can be viewed under Batch Management. Payments sent to Batch Management will not be processed until you go to Batch Management and accept the payments. For more details, view the Batch Management tutorial.

  • 6Once you have entered all the mandatory information, click Quote. The Current Transaction Quote box will then appear with a summary of the transaction details, including the Rate, Fee and Total Cost.

TIP :The Value Date is the estimated date that the funds will be released to the beneficiary bank. Please note that if additional information is required, the value date may change.
Steps for requesting a quote for making spot payments by entering the currency and amount details.

Entering Payee Information


You must enter the information for the payee receiving the payment. To do so, either Select from Existing Payee List or Create a New Payee.


  • If you choose to Create a New Payee, manually enter the information in the fields on the right.

  • To complete the Bank Details, use the Bank Search button – there’s more on this below.

  • If you wish to add a note, Notes to Payee will be sent with the payment instruction. Notes for You/Internal comments are for your use only – they will not be viewable by your payee.

TIP : Payees are currency driven – only payees that match the currency selected will be available. For more details, view the Creating and Managing Payees tutorial.


Searching for a Bank


For telegraphic transfers, the payee section will display the Search for Bank option, as well as the related bank information fields. To search:


  • 1Click the magnifying glass icon. A new overlay window will appear.

  • 2Enter the country of the bank you are sending to and provide the required details as indicated.

  • 3Once the correct IBAN, SWIFT or Routing Code has been entered, the bank information will show in the box below. See the Glossary for an explanation of unfamiliar terms.

  • 4Click on the correct bank name, and the bank details will autofill.

Steps to input the payee information that includes bank details and any specific notes/comments about the payee.

Completing your Payment


Once you have entered all the mandatory information, you have three options:


  • 1Click Accept to execute the transaction immediately.

  • 2Click Send to modify queue to save the transaction for editing before final approval. The transaction can be accessed in Modify a Payment. For more details, view the Modifying a Payment tutorial.

  • 3Click Send for Approval if you do not have the required authorization level to approve the transaction. With this option, you can notify an approver by email by checking the appropriate box. The transaction will be sent to Approve a Payment. For more details, view the Approving a Payment tutorial.

With any of the options above, you will be able to Print details of the transaction or Save as PDF.


Contact us


Existing members


Our Customer Service team is available daily from 8am to 6pm, Monday through Friday. 1300-554-884

Existing FX International Payments customers login here